I've known her foreeeeever. Long enough that she actually receives, from time to time, clothing I have sewn. Such as the skirt in this photo:
She likes it, she just makes that face in photos sometimes? This is from about a month or two ago. I have been very slow on the bog upkeep it seems. Here's a close up with the waistband.
It's just some 2" elastic. Do you want to make one? It's easy-peasy.
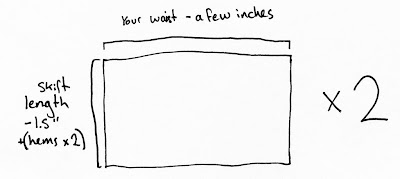
Directions (with super-official diagrams)
1. Choose a drapey fabric and pre-wash it. I used rayon challis for this skirt. With parrots on it, which are optional but highly recommended. Emma's skirt used one generous yard of fabric with very skinny hems, and measures 17" long from the top of the waistband. You might want to get extra, if your fabric shrinks a lot, or you like a longer skirt. Myself, I like my skirts about 20" long. A yard and a quarter should cover it. You also need a yard of waistband elastic, 2" works well.
2. Cut two panels the length you want your skirt minus 1 1/2 inches for the waistband, then add hem allowances. You're going to skinny hem the top and bottom of your fabric, so add those measurements in twice. My hem was 1/4" turn up, then 3/8" finished, so I added 1 1/4". The panel width should be a little smaller than your waist measurement each for a good amount of skirt. So about 30" each for a 34" waist. Make the panels wider if you want a fuller skirt, but you might have trouble stretching the elastic enough while sewing later.
This all sounds fairly precise, but I just sort of eyeballed it, then tore instead of cutting. Yep, I am a rebel like that.
3. French seam the sides together, or use your preferred seaming/finishing technique. Now skinny hem both the top and bottom edges, using the measurements you accounted for when cutting your panels. In my case that was 1/4" turn up, then turned up another 3/8" and topstitched in place. You now have a tube of fabric with all the edges finished.
4. Find a comfortable length for the elastic around your waist, add an inch and cut. Sew the elastic ends together using a 1/2" seam and finish the ends. I just zigzagged over the raw edges.
5. Pin the fabric tube evenly around the band, right side of the fabric facing the wrong side of the elastic 1.5" down from the top. I did this by pinning the sides, front and back, then the space in between each of those points, then the space in between each of those points. With less than that many pins it's very hard to keep even when sewing.
6. Using a multistage zig-zag stitch (or regular zig-zag if your machine doesn't have that stitch), sew the fabric to the waistband, stretching the elastic as you go so that it is the same length as the fabric. Use a hand on either side of the needle lengthwise, and be very careful.
Warning: If the fabric shifts while the needle's in there it can break (and possibly fling at you), or go off course and gum up your machine. I've never had a problem doing this, but my machine is old and cheap and I'm not terribly worried about it getting messed up. So yes, be very careful and take your time.
AND YOU'RE DONE! Good job.
If you make a skirt from this, I'd love to see it.


1 comment:
nice post thanks for update
Post a Comment